
Drupal 8 has a new core module, the Tour module, which allows us to set up a contextual help to guide users of a Drupal 8 site for their first steps on it, whether for the discovery of their user profile, the possibilities offered to them, how to create content or the overall management of the site's contents.
Little known, probably because it does not yet have a user interface, this module can be very useful to create in a few minutes contextual help that will make the status of your site at a higher speed, from the users's point of view. Myself, although I knew the existence of the tour module, I had never really bothered to look at it. And yet what a gain for the user experience!
A contributed module should provide a user interface to create and manage the different steps of a guided tour, but until the module is fully operational on Drupal 8 we need to create the different content elements of our guided tour from a YAML configuration file.
The setting up of guided tours is relatively simple and is carried out in 2 steps
- We create our guided tour within a YAML configuration file, give it an identifier, a label and assign this guided tour to one or more routes
- Then we add as many steps as necessary in this configuration file, assigning them to a class or an html identifier present in the page markup.
Let's create a guided tour of our new site
We will create a new module, which we will call my_tour, and add the Tour module as a dependency.
#File my_tour.info.yml

name: 'My Tour'
type: module
description: 'Provide Tours.'
core: 8.x
dependencies:
  - tour
version: 8.x-1.0
We will add our first guided tour by creating the file tour.tour.front.yml in the config / install directory of our module. The name of this file is important and should follow this pattern: tour.tour. [Identifier] .yml. The identifier of our guided tour must then imperatively be front.
The structure of our module looks like this.

You will notice the presence of the file my_tour.features.yml. Given the lack of user interface, this file will allow us to easily manage and update content tips of the guided tour. This file my_tour.features.yml containing just the value true, allows us to declare our module as a feature and will allow us to be able to import its content in the active configuration in our Drupal 8 project.
Indeed our guided tour, created with the file tour.tour.front.yml, will be installed and loaded when our module will be installed. To avoid having to uninstall and reinstall the module to update the tips's content of the tour, we can therefore use Features.
Creation of the guided tour and its steps
The configuration file for a guided tour consists of a main part stating the visit, its identifier, its label, and the route name on which the tour will be active, followed by a tips entry containing all the steps of this tour. Below is an example of a guided tour (tips's content are in french)
langcode: fr
status: true
id: front
label: 'Bienvenue sur le site'
module: my_tour
routes:
  - route_name: view.front.page_front
tips:
  front-main:
    id: front-main
    plugin: text
    label: 'Bienvenue'
    body: 'Cette visite guidée se lance automatiquement au chargement des pages si elle est disponible. Vous pouvez désactiver ce lancement automatique depuis votre <a href="/user">compte utilisateur</a>, et relancer à tout moment une visite en cliquant sur <stong>Tour</strong> situé en haut à droite de la barre d''outils'
    weight: 1
  front-menu-edition:
    id: front-menu-edition
    plugin: text
    label: 'Menu Edition'
    body: 'Ce menu vous donne accès aux tableaux de bord et lien de création des différents contenus'
    weight: 2
    attributes:
      data-id: toolbar-item-uas-core-toolbar-content
  front-menu-users:
    id: front-menu-users
    plugin: text
    label: 'Menu Utilisateurs'
    body: 'Ce menu vous permet de gérer les utilisateurs du site, d''en créer de nouveaux, de leur attribuer des roles, etc.'
    weight: 3
    attributes:
      data-id: toolbar-item-uas-core-toolbar-users
  front-menu-structure:
    id: front-menu-structure
    plugin: text
    label: 'Menu Structure'
    body: 'Ce menu vous permet de gérer les éléments structurants du site, tels que les menus, le placement des blocs, la gestion des taxonomies (mots clés, catégories, rubriques)'
    weight: 4
    attributes:
      data-id: toolbar-item-uas-core-toolbar-structure
  front-general-help:
    id: front-general-help
    plugin: text
    label: Aide contextuelle
    body: 'Chaque page dispose de sa propre aide contextuelle telle que vous êtes en train de la lire. Pour la consulter il vous suffir de cliquer sur le <strong>? Tour</strong>  en haut à droite'
    weight: 5
    location: left
    attributes:
      data-id: toolbar-tab-tour
  front-general-config:
    id: front-general-config
    plugin: text
    label: 'Configuration par défaut'
    body: 'Lors de sa génération le site est livré avec une configuration par défaut, et des contenus pré-renseignés.'
    weight: 6
  front-general-menu:
    id: front-general-menu
    plugin: text
    label: 'Menu de Navigation principal'
    body: 'Le menu de navigation principal peut contenir des liens vers des contenus, des termes de taxonomy, ou encore certaines vues pre-paramétrés pour certaines focntionnalités types telles que les actualités, les événements, les productions. Vous pouvez gérer ce menu depuis le Menu Structutre, ou encore y accéder depuis le lien contextuel qui apparaît au survol du menu.'
    weight: 7
    attributes:
      data-id: navbar
  front-general-slider:
      id: front-general-slider
      plugin: text
      label: 'Diaporama'
      body: 'Vous disposez d''un type de bloc vous permettant de créer des diaporamas et de les placer sur n''importe quelle page. Vous pouvez retouver les blocs diaporama créés, ainsi que tout autre type de bloc, dans la <a href="/admin/structure/block/block-content">librairie des blocs</a>.'
      weight: 8
      attributes:
        data-id: block-slider-hp
  front-general-block:
    id: front-general-block
    plugin: text
    label: 'Bloc de contenu'
    body: 'Outre les contenus que vous pouvez publier sur le site, vous pouvez aussi créer des blocs de contenu simple et les placer sur les pages qui vous conviennent. La différence majeure entre un contenu et un bloc est que les contenus dispose d''une page dédiée, avec une adresse url, tandis que les blocs doivent nécessairement être placés sur des pages existantes. '
    weight: 8
    attributes:
      data-id: block-presentation-site
  front-general-accueil:
    id: front-general-accueil
    plugin: text
    label: 'Les dernières actualités'
    body: 'Ce bloc qui remonte les derniers contenus publiés sur le site ne peut pas être enlever. Si vous ne souhaitez pas ce bloc il vous suffit de ne mettre aucun contenu en avant sur la page d''accueil. Pour ce faire, aller sur votre tableau de bord, et lancer l''aide contextuelle'
    weight: 9
    location: top
    attributes:
      data-class: 'view-accueil'
  front-footer:
    id: front-footer
    plugin: text
    label: Pied de page
    body: 'Le pied de page contient quelques blocs de menu, dont notamment le menu liens utiles et le menu Pied de page. Vous pouvez personnaliser les liens contenus dans ces menus depuis la gestion des menus.'
    weight: 10
    location: top
    attributes:
      data-class: footer
The main part of our visit consists of the following elements. We have the identifier id of the guided tour, which must be identical to the identifier set in the name of the YAML file, its label, as it will appear on the Help page if the Help module is installed, and routes on which the tour will be active. Here our visit will be active on the homepage of the site, which corresponds to a view whose route name is view.front.page_front.
langcode: fr
status: true
id: front
label: 'Bienvenue sur le site'
module: my_tour
routes:
  - route_name: view.front.page_front
The different steps (tips) of our guided tour consist of the following elements:
- Id: the identifier of the step
- Plugin: the plugin type (only the text plugin is available)
- Label: the label will appear as the title of the displayed tooltip
- Body: it contains the html content of the tooltip
- Weight: the weight assigned to step. The steps are displayed in ascending order of weight
- Location: optional parameter, you can specify where the tooltip will be positioned relative to the targeted html element. Possible values are top, left, right, bottom
- Attributes: optional parameter. We can attach our tooltip to a html class present in our page (specifying data-class: NAME-OF-CLASS), or to an html id present on the page (specifying data-id). If we declare a data-class or data-id attribute, and this attribute is not present on the page then the step is not displayed. If, on the other hand, we do not specify at all this parameter for our step then this one will be displayed centered, inside a modal on the page, without being attached to any element html.
front-footer:
  id: front-footer
  plugin: text
  label: Pied de page
  body: 'Le pied de page contient quelques blocs de menu, dont notamment le menu liens utiles et le menu Pied de page. Vous pouvez personnaliser les liens contenus dans ces menus depuis la gestion des menus.'
  weight: 10
  location: top
  attributes:
    data-class: footer
And that's all.
You now have a guided tour on your homepage. On each page that has a visit, the launch button Tour of the visit will appear on the Drupal toolbar.

Automatic launch of a guided tour
But for new users, unfamiliar with the site, it may turn out that they take a while to realize the existence of such a feature. If they noticed one day and click on the Tour button.
Depending on the situation, it may be interesting to automatically start a visit, if it exists, when loading a page. So the user immediately detects this contextual help, he can not miss it.
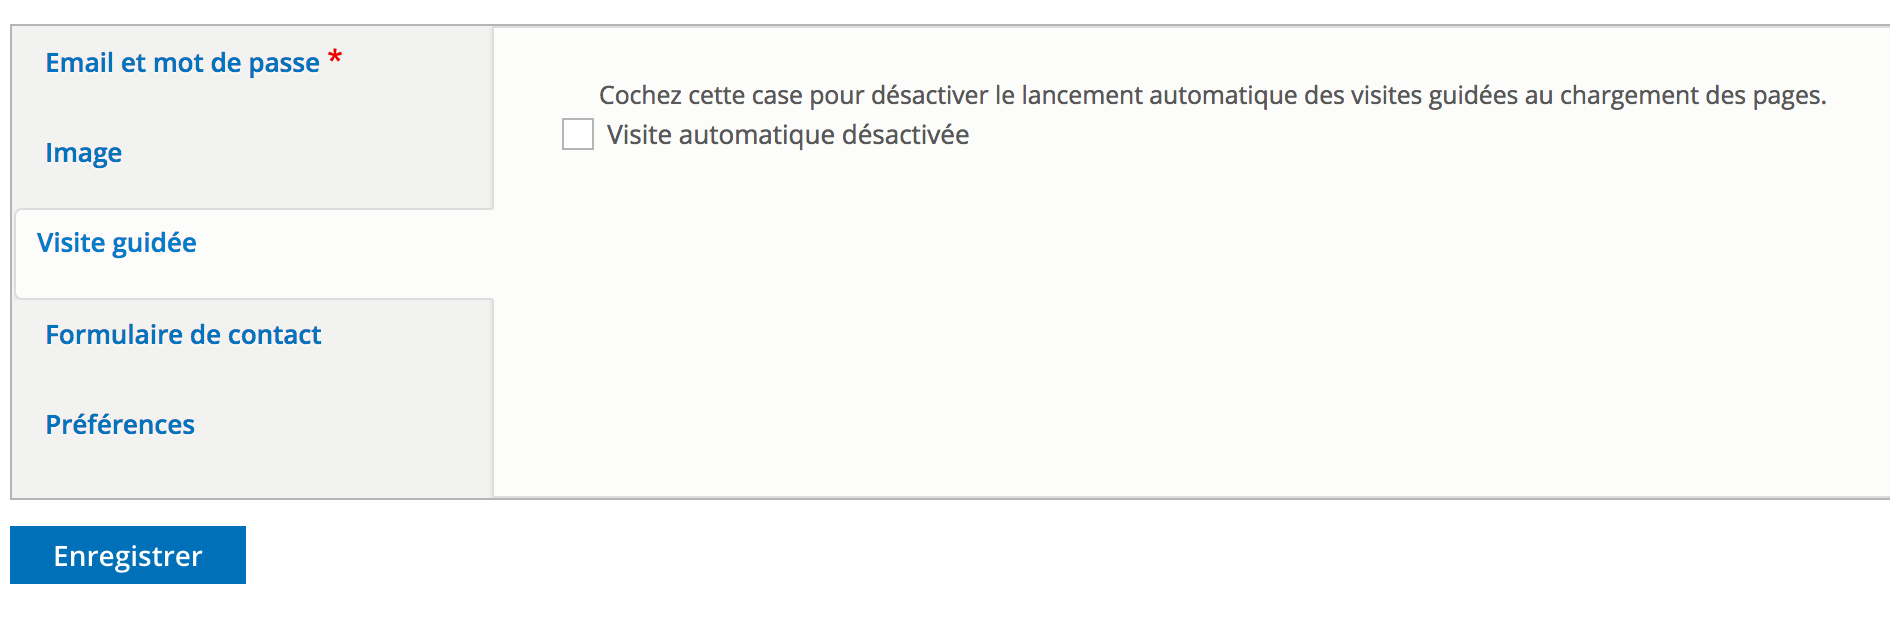
This can be achieved very simply. The simplest method can be to trigger a visit if it exists according to a setting present in the user's profile. It is enough, for example, to add a Boolean field to the users entities, for example the field field_tour_disabled, which by default is not checked. To deactivate the automatic launch, the user would only have to check this option in his profile.
And it is enough to load a library on the pages if this option is not checked.
/**
 * Implements hook_page_attachments().
 */
function my_tour_page_attachments(array &$attachments) {
  // Automatically launch tour if not disabled by user.
  if (\Drupal::currentUser()->hasPermission('access tour')) {
    /** @var \Drupal\user\Entity\User $user */
    $user = User::load(\Drupal::currentUser()->id());
    $tour_disabled = $user->field_tour_disabled->value;
    if (empty($tour_disabled)) {
      $attachments['#attached']['library'][] = 'my_tour/tour';
    }
  }
}
And the js file in our my_tour/tour library might look like this:
(function ($, Drupal) {
  'use strict';
  $(document).ready(function() {
    var help = $('.toolbar-icon-help');
    if (help.length) {
      help.click();
    }
  });
}(jQuery, Drupal));
Note that we could also use the user's cookies to register this deactivation, and that there are certainly many other methods to achieve the same purposes.
And now, as soon as a page has a contextual help (or a guided tour), it is launched automatically.
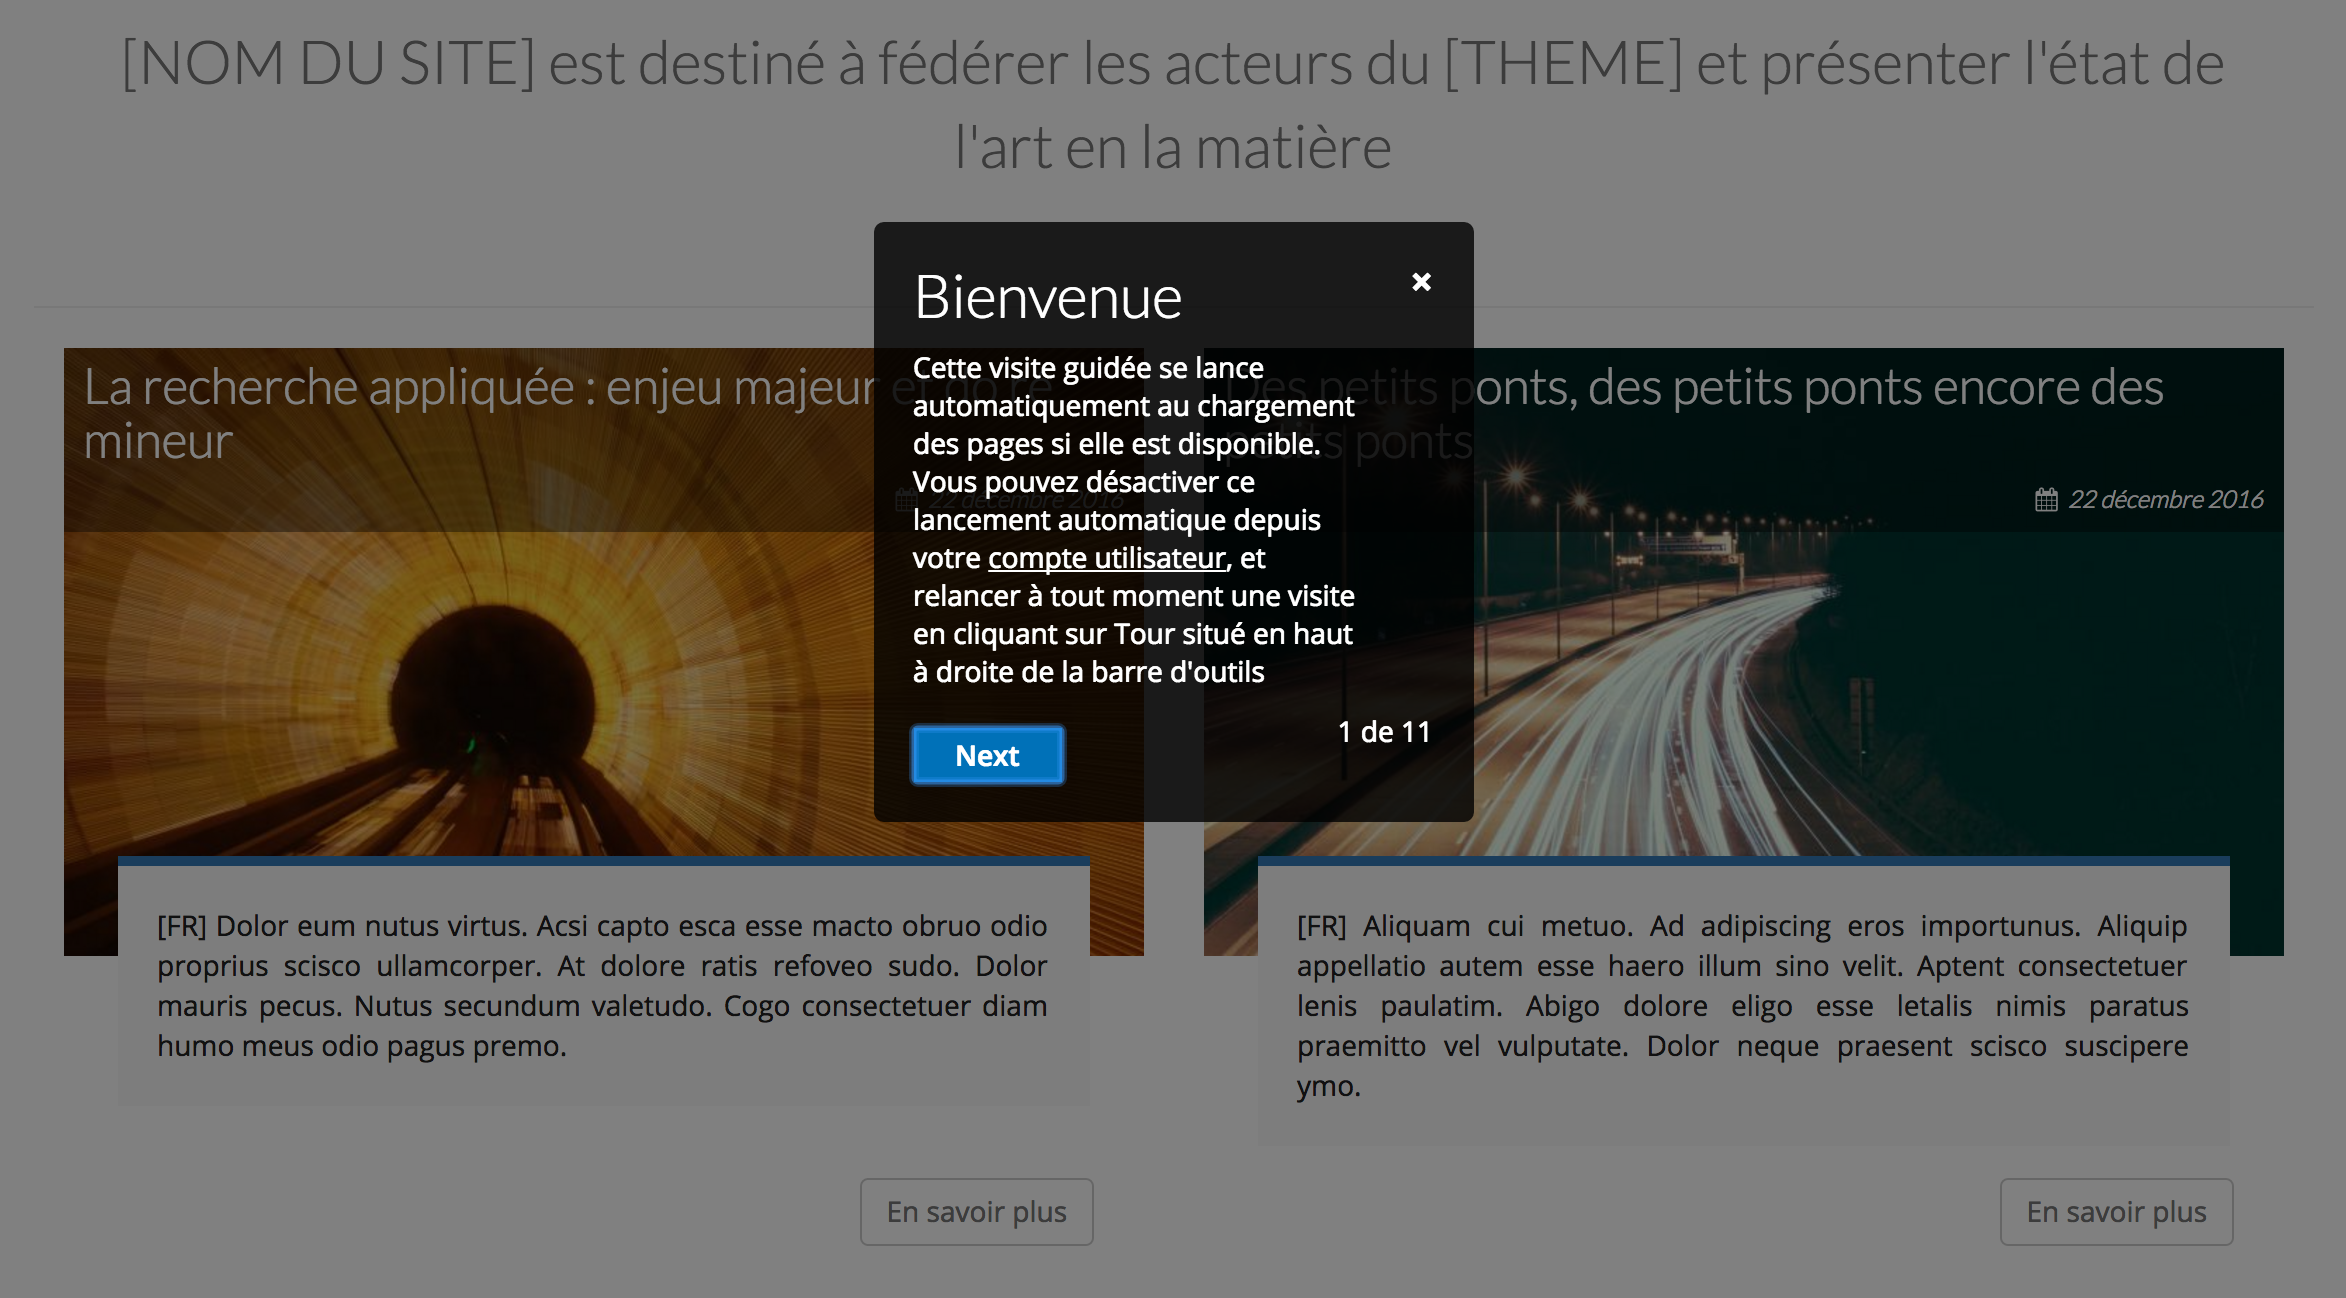
While this may seem slightly invasive at first, it is nevertheless an efficient method to inform users about the existence of these guided tour which can help him to apprehend more easily and quickly a new interface. Automatic start that users will can activate / deactivate from their profil.
The documentation is dead! Vive Tour!
If the Tour module can seem, at first, be unfinished, because it does not have a user interface, It is none the less that it is really very effective. It allows you to write contextual documentation, built directly into user interfaces, giving users immediate access to relevant information, rather than directing them to a 300-pages document full of screenshots, document that needs to be drafted and updated .
Writing the steps for these visits can be done simply by using any text editor.
We can also note the existence of the project Tour Builder (needs work) whose the main idea is to exchange Tours with ease between Tour Writers and module Coders.
Ajouter un commentaire